This Was The Zodiac Speaking

The Zodiac Killer (Lake Berryessa).
Driven by curiosity, I began to delve deeply into the Z13 cipher. What started as an exploration out of pure interest quickly grew into an extensive and constantly evolving investigation. I have already shared my preliminary findings with you, but the document has continued to grow since then. New information, insights, and connections are emerging at a rapid pace.
With due caution, I would like to share with you a possible direction for solving the Z13 cipher. Certainty always remains limited with complex issues such as this, but based on my current research, I believe I can make a cautious, hopefully valuable suggestion.
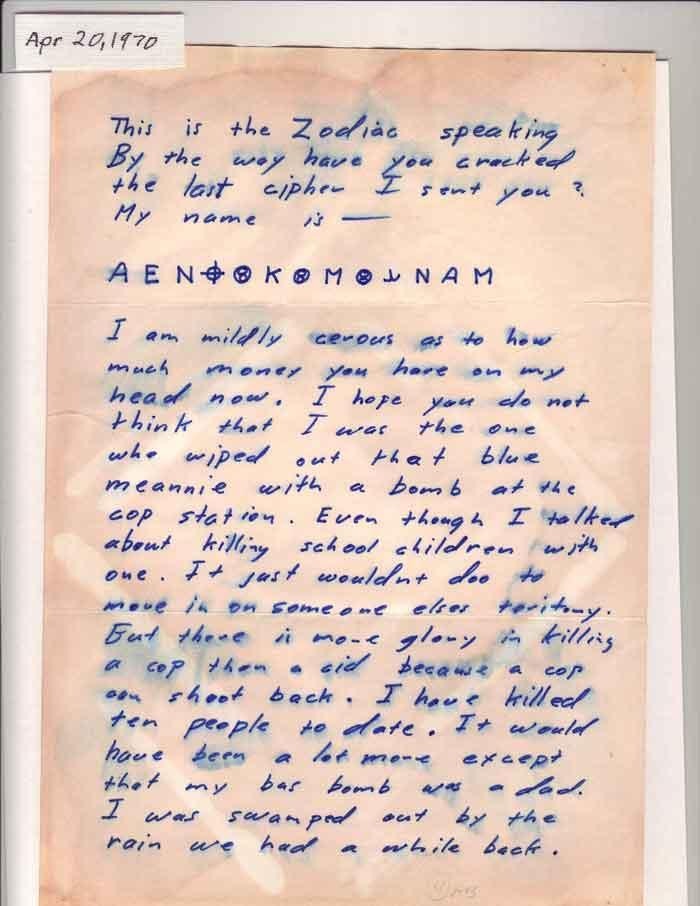
Above you can see the entire letter.
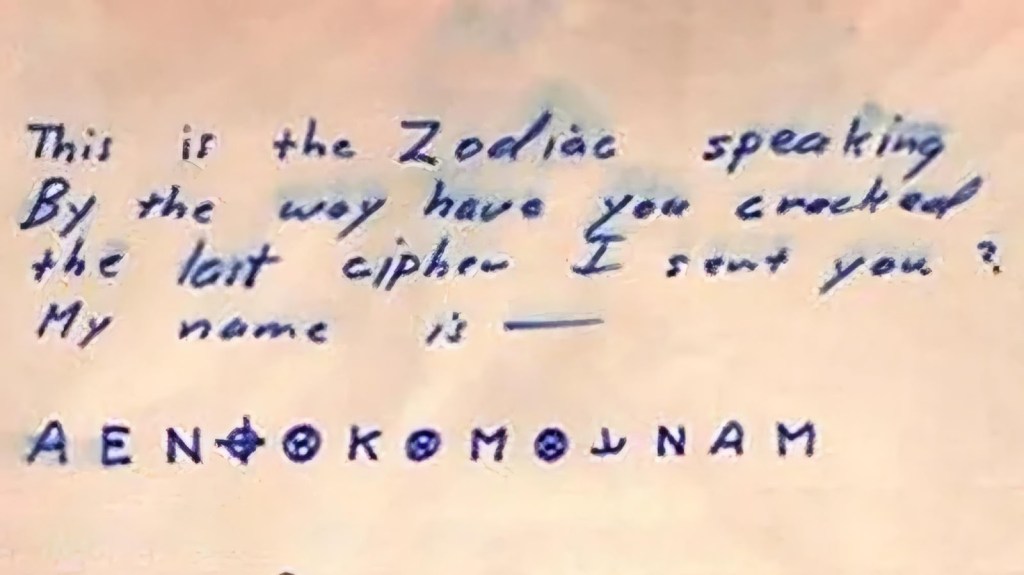
Above you will find the first part of the letter and the complete cipher.
From this point onwards, I will begin the actual substantive part of my analysis. I am working on the assumption that the cipher consists of three separate components.


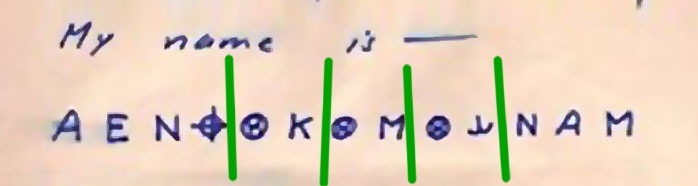
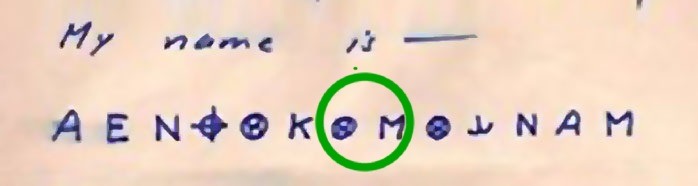
Above, you can see the different codes that will soon come together.
In 1969, the Zodiac Killer sent his famous Z408 cipher in three separate sections, spread across three newspapers: the San Francisco Chronicle, the San Francisco Examiner, and the Vallejo Times-Herald.
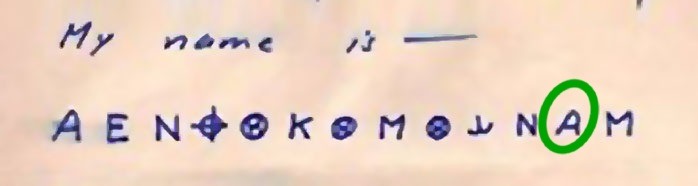
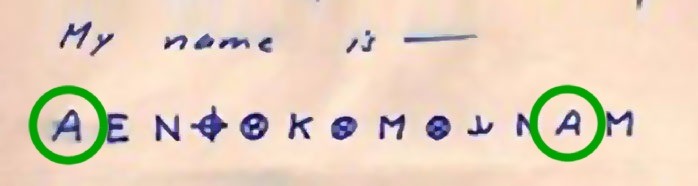
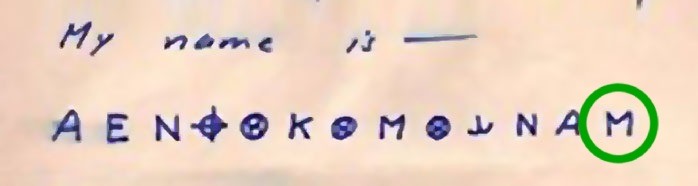
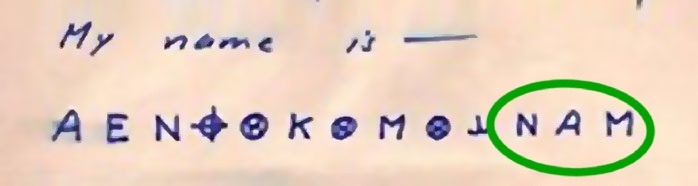
Although the Z340 cipher was not sent in three separate parts, it does appear to need to be split into three distinct segments. Interestingly, the same applies to the Z13 cipher: this code can also be divided into three parts.
An interesting detail here is that the first part of the Z13 code displays the word ‘NAME’, but without the “M,” while the last part ends with ‘NAME’, but without the “E.” Together, the missing letters form‘ME’,a subtle and thematically striking reference within the Z13.
We begin by deciphering the first part of the cipher.
The code is relatively short, which makes deciphering it considerably more difficult: there are few clues and hardly any statistical patterns to fall back on. That is precisely why I suspect that, if you look closely, the Zodiac has given us a subtle clue.

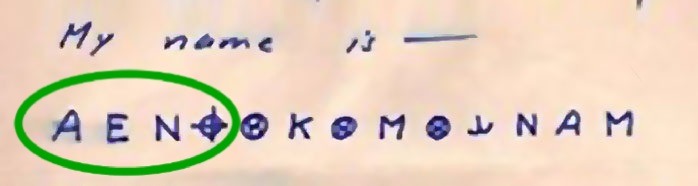
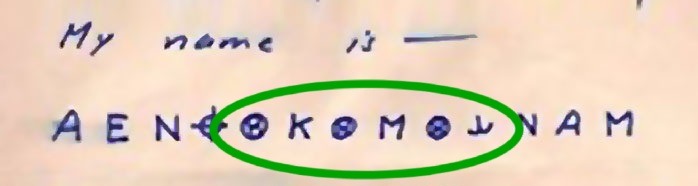
The first three symbols, ‘A E N,’ appear to correspond to ‘I A M.’

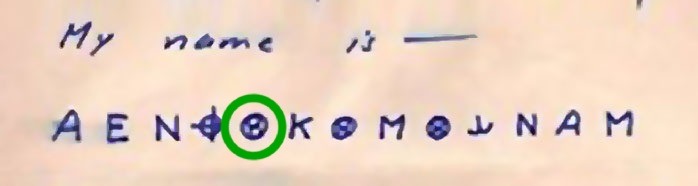
The fourth symbol is a cross through a circle, the well-known Zodiac symbol. This symbol therefore stands for the ‘Z’ of Zodiac. Further deciphering of the cipher will reveal that this interpretation of the symbol is correct. This gives us the sequence ‘I A M Z’, and the first part of the code is now complete.
We will now continue with the second part of the cipher.

Above, you can see the second part of the cipher.
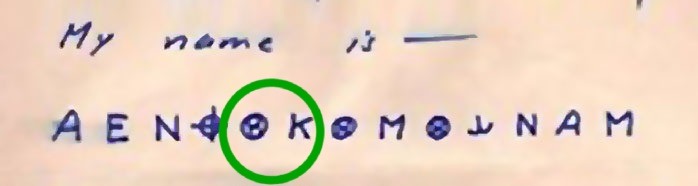
The fifth symbol appears three times in this code, as the fifth, seventh, and ninth symbols. All of these symbols are located in the second part of the cipher. Compared to the first part, the encryption in this segment is considerably more complex.

While deciphering, I noticed that these symbols are not meant to represent letters. At first glance, they may seem random or meaningless, but they actually play a crucial role in the structure of the code. Each circle-8 symbol is linked to the symbol that follows it, making both necessary to decipher or verify a single letter. Without these symbols, the result would be completely random.
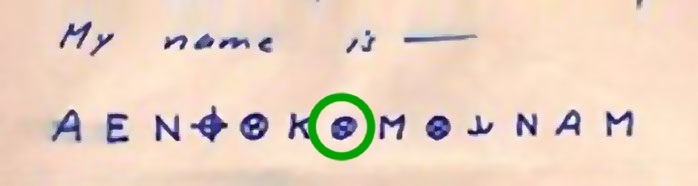
The second part of the cipher can be divided into three segments. We start with the first part of the middle section.

The fifth symbol consists of a circle containing the number 8. From this point, the intention seems to be to take eight steps forward.
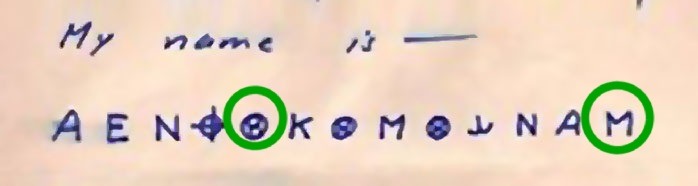
This brings us to the 13th and final symbol of the code: the symbol ‘M’. We need the meaning of this symbol in order to correctly decipher the next symbol. I believe that the Zodiac used alphabetical mirroring of half the alphabet.
The entire code consists of 13 symbols. The first symbol is an ‘A’ and the last symbol is an ‘M’. The alphabet has a total of 26 letters, but if you divide only the first half of the alphabet (A–M) in two and mirror it within that group, A and M are opposite each other. This suggests that the outcome of the 13th symbol is an ‘A’, and that the fifth symbol therefore also refers to an ‘A’.
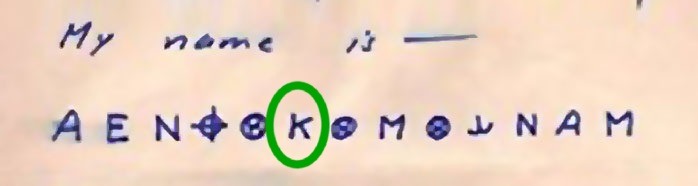
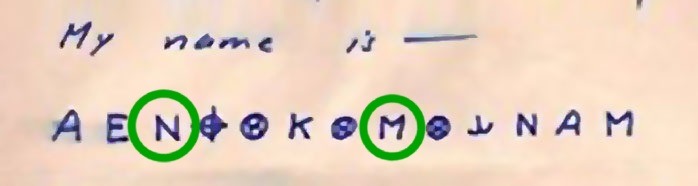
The sixth symbol is a ‘K’. From this point, we would again need to take eight steps to verify that the sixth symbol actually represents an ‘A’.

Eight steps bring us back to the first symbol of the code: the symbol ‘A’. This reinforces the possibility that the first and last symbols of this code are connected, suggesting that this is a case of alphabetical mirroring. Since symbol five refers to an ‘A’ and symbol six also ends up as an ‘A’, this confirms that symbol six actually has the meaning ‘A’.
We will now continue with the second part of the middle section.
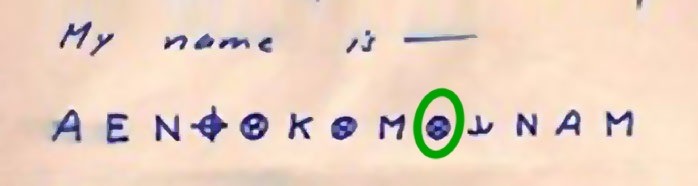
The seventh symbol, a circle with the number 8, indicates that we must take eight steps forward from here.

This brings us to the second symbol in the code, ‘E’, which we previously identified as an ‘A’.

The eighth symbol is an ‘M’. Earlier, we determined that, due to the alphabetical mirroring of the 13th symbol, the ‘M’ stands for an ‘A’. This confirms that the reference of the seventh symbol to an ‘A’ is correct, and that the eighth symbol also has the meaning ‘A’.
We now have double confirmation that the eighth symbol, ‘M’, stands for an ‘A’. However, from this point on, we still need to take eight steps forward to remain consistent.
The eight steps bring us to the third symbol, ‘N’. Earlier, we looked at the mirror image of half the alphabet, but when you mirror the entire alphabet, ‘M’ and ‘N’ are opposite each other. This could indicate that in the next step, we need to mirror the entire alphabet to decipher the remaining symbols.
We will now continue with the last part of the middle section.

The ninth symbol is a circle-8 symbol. From this point, we must take eight steps forward.

In eight steps, we reach the Zodiac symbol, to which we previously assigned the letter ‘Z’.

The tenth symbol resembles a mirrored and stylized ‘L’, with the two parts merging into each other.
Since this symbol is again preceded by a circle-8 symbol, we must take eight steps forward for the last time.

The eight steps bring us to the first circle-8 symbol, which previously referred to an ‘A’.
We have just seen that the eighth symbol, ‘M’, refers to ‘N’, or a mirror image of the entire alphabet. The ninth symbol refers to a ‘Z’, and the tenth symbol to an ‘A’, Not surprisingly, this also forms a mirror image of the entire alphabet.
But what can we do with this? Take a close look at the ninth symbol: if you remove the 8 from the circle, you are left with an ‘O’. With the tenth symbol, if you remove the mirrored ‘L’, you are left with a stylized ‘L’. If you mirror the alphabet from Z to A, as is the case here, the O and the L are exactly mirrored opposite each other.
This means that the tenth symbol stands for an ‘L’.
That’s not all. The tenth symbol has an additional encryption: it is not yet in the correct position. Symbol 6 is a ‘K’, symbol 8 is an ‘M’, and between them is a symbol with a circle-8. There is only one letter in the alphabet between K and M, namely ‘L’. This indicates that the ‘L’ must be moved between K and M in order to interpret the code correctly.

This transportation also fits seamlessly with the way in which we must decipher the last part of the code.

The third and final part of the code is shown above.
We have already deciphered the last three symbols of the code.


We are now at the 11th symbol. From this point on, we will combine the solutions of the previously deciphered symbols. The symbol ‘N’, which previously represented ‘M’, now has the meaning ‘M’ again.
The 12th symbol is an ‘A’. This symbol previously represented ‘I’ and now has the same meaning again.

We have already deciphered the 13th and final symbol, ‘M’, which stands for ‘A’.

We have deciphered the third part of the code as ‘M I A’. This part shows a striking pattern: the correct letters are present, but none of them are in the right place. This is a classic feature of transposition, as we saw earlier with the tenth symbol.
By rearranging the letters correctly, the correct order appears: ‘ I A M’.

The deciphered code, when put together, reads: ‘I A M Z A L A I A M’. To obtain the final solution, the three previously deciphered parts must now be mirrored, read from back to front.
Above it says: ‘I A M’, or: ‘I AM’.
Above it says: ‘A L A’, which are the initials of: ‘ARTHUR LEIGH ALLEN’.

Above it says: ‘I A M Z’, or: ‘I AM ZODIAC’.
Result: I AM ARTHUR LEIGH ALLEN I AM ZODIAC
PS: Ralph Spinelli claimed that Arthur Leigh Allen approached him with an offer to eliminate people for a fee. He made this revelation in the documentary “His Name Was Arthur Leigh Allen.” Particularly striking was the wording Allen used to indicate that he was the Zodiac: “I am Zodiac” instead of “I am the Zodiac.” Spinelli drew attention to this linguistic detail in the documentary because it deviated from the usual wording and thus establishes a direct link between Allen and the deciphered part of the Z13 cipher. Part of the code contains exactly the message “I am Zodiac.” This detail is striking because it suggests that Allen used exactly the same wording as the Zodiac Killer himself.
Finally: The Z13 cipher is exceptionally short, which makes definitive verification of a decryption without additional evidence difficult. However, it is precisely this brevity that makes the Z13 special: because there is so little text to work with, additional context becomes all the more important. In other correspondence from the Zodiac, including the Z340, the 13 Hole Postcard, and the Halloween Card, I have found a series of clues that not only tie in with my proposed interpretation of the Z13, but also further support its content and place it in context. The similarities, patterns, and references in this correspondence can provide valuable clues for solving the cipher and thus serve as further confirmation of the proposed interpretation.
In the coming weeks/next month, I will systematically elaborate on these findings and share them with you.
